*creating presentations |
|
As you explore these popular tools for creating presentations think about what it is you are teaching and reflect on the following questions to help guide you in choosing the most appropriate tool.
1. What are the goals of my lesson? 2. Why is this particular tool a good fit for this particular lesson? 3. How will my students benefit from using this tool? 4. What features are most important for me? 5. What features are most important for my students? 
Check out this great resource before you & your students begin any project.
|
*Activity: After introductions you will explore & create using tools of your choice. There is a lot here, so choose carefully! ☺
Resources to Present Your Creations:
Find Free Pics and Sound for Your Creations:

Evaluate Using a Rubric:
|


Like PowerPoint, but cooler!

new!
|
|
Create mini posters

Create a virtual poster
|


no account needed
|

Make a Poster
|


Tutorials for Various Versions

Turn your PPT into a movie with sound and embed it into your webpage.
|
Pete's Powerpoint Station


Different Backgrounds and Fonts
|

|

Create offline using the Google Slides App
|
|
Seven Steps for Creating Videos In Your Classroom by Richard Byrne
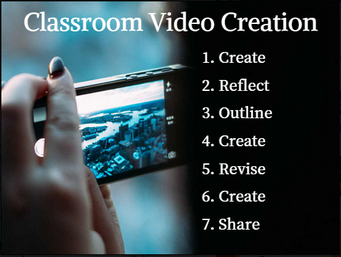
1. Create - let the kids have a crack at making their videos. If some students have a nature inclined to planning first, let them. If others want to jump into the process right away, that's great too. When I make screencast videos I don't always plan them first, I just make them. If the first attempt doesn't result in a polished work, that's okay because now I know what I need to change for the next attempt.
2. Reflect - take a look at what was made. What is good about it? What needs to be changed?
3. Outline - create that outline or storyboard now that you know what to keep and what to change.
4. Create - this is the second attempt at the video.
5. Revise - take a look at what the second attempt at creation yielded. Revise the outline again for the next round of editing or re-shooting.
6. Create - this is the second round of editing or it could be a complete re-shoot of a video.
7. Share - when you're happy with your video (it may take many more rounds of steps 5 and 6) share it with the world. Share it on Next Vista for Learning, YouTube, your classroom blog, or anywhere else that there is a potential audience for your work.


*digital storytelling & audio
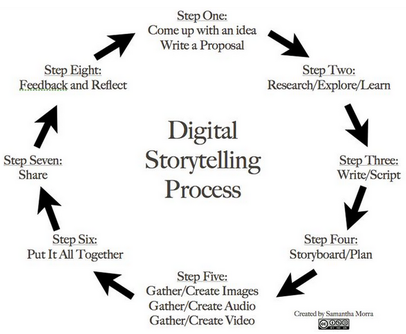
What is Digital Storytelling?Comic Creator
from readwritethink |


|


|


|


YouTube Tip
Show YouTube videos full screen by copying the video's link from within the embed code, paste that link on a tab and video will play full screen with no sidebars, etc. |
|


something more:

Bring TED to your classroom with TED-Ed Clubs!
TED-Ed Clubs is a flexible, school-based program that supports students in discussing, pursuing and presenting their big ideas in the form of short TED-style talks. Watch the video and visit the site to learn more. |
|